As I noted recently, I love my worms.
For the past couple of years I’ve had a Can-O-Worms worm farm in the backyard (although they’re also fine in the kitchen, if you have room). In fact, I love it so much that it came with me when I moved overseas.
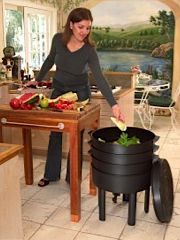
Here’s a look at this superb piece of equipment.
What is a worm farm? What do you do with it?
 Before discussing the Can-O-Worms itself, let’s take a step back and look at worm farms in general. After all, they’re not as common as they should be.
A worm farm is like a potted plant, without the plant. It’s a large container filled with soil, with drainage holes in the bottom and some sort of a lid to keep out the rain. Living in the soil are several hundred worms.
The idea behind it is simple : your kitchen scraps (teabags, potato peelings, eggshells and so on) are put in the top, and the worms convert this into nutrient-rich ‘casts‘ and fertiliser. These can then be added to your vegetable garden, and the process starts again.
NB : The ‘casts’ (sometimes called ‘vermicasts‘) are really just lumps of soil that have already been processed by the worms.
The Can-O-Worms
When I bought this, there really wasn’t all that much choice. However, it has several features which have kept at the top of the worm-farm list for some time. These include :
- The bulk of the device stands on several ‘stilts’, which allow airflow under and around the worm farm. In addition to preventing the setup from smelling foul, this height also enables a watering can or bucket to be easily placed beneath the tap (for liquid fertiliser – aka ‘worm tea’).
- The Can-O-Worms is made up of several layers, which are simply ‘shuffled’ when the top one becomes full. The worms will automatically find their way to whichever one is on top; where the food is.
- This is an extremely low maintenance device. However, the replacement items (such as a mat for the topmost section, to keep moisture out) are easy to get in garden centres around the world.
Kitchen to Yard : using a worm farm
When it comes to transferring the kitchen scraps to the worm farm, there are several ways of handling things. As I like to keep things simple, I :
- use a dedicated ‘peeling rack’ above the kitchen sink. This just catches peelings and other scraps when I’m preparing a meal. The worms will eat almost anything, so I always end up with a fair bit of material.
- I keep an empty ice-cream container (any reasonably large plastic container with a lid is fine) beneath the sink. When I’m clearing up, the contents of the ‘peeling rack’ go in here. I also add teabags, coffee grounds, eggshells and small amounts of paper whenever they become available.
- Whenever the container is full (every few days or so) I take it out and empty it into the top of the worm farm.
That’s it.
Great, where can you get the Can-O-Worms?
There are two main sources for something like this. They are :
- garden centres, or almost anywhere you buy plant pots, soil or fertiliser
- environmental stores, such as Wiggly Wigglers in the UK, Happy D Ranch in the US or Kookaburra Worm Farms in Australia
Final thoughts on the Can-O-Worms
There are two main reasons for getting the Can-O-Worms – or any other – worm farm. These are :
- There’ll be a lot less garbage to put out in the trash can each week
- The fertilizer it produces is great for the veggie garden, so you’ll end up with more – and tastier – food
Additionally, it can be a great project for the kids. As long as they don’t try to name all of the worms, that is.
As far as I’m concerned, the combination of less work/more food (healthy, of course) is a definite winner.
Comments are closed.